How to Make a Picture Transparent in PowerPoint?
Know how to make a picture transparent in PowerPoint and create stunning presentations that stand apart from the rest.
Are you trying to make a picture transparent in PowerPoint and you feel you could do with some help?
It is a brilliant hack to cut out unwanted noise in your presentations.
This step-by-step will enable you to make your presentations look sharper than before - no matter whether you use PowerPoint 2010, 2013, 2016 or the latest version, i.e., PowerPoint 2018.
So, roll up your sleeves and read along.
Why Do You Need To Make a Picture Transparent In PowerPoint?
Let us first understand what you can achieve by making a picture transparent in PowerPoint:
- Get rid of needless distractions from the slide
- Enable the audience to focus on a specific portion of an image while retaining the larger picture
- Use a lighter or transparent background image to highlight elements (text, icons, other images, etc.) in the foreground.
- Use pictures as watermarks for a slide
How to Insert a Picture in PowerPoint?
Before we can make a picture transparent, let us first understand how to insert an image.
On the top of the menu on a PowerPoint slide, go to the Insert option -> Pictures -> insert your picture from either the ‘Photo Browser’ or ‘Picture from File’ options. This step lets you locate an image from your local computer.
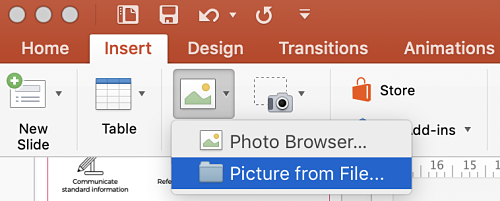
If you’re using a Mac, you have an additional menu option at the top of the screen (above the PowerPoint menu) to insert a picture from your computer.
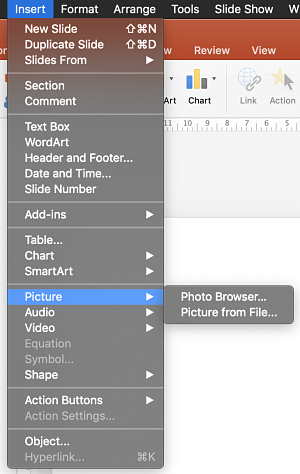
Those of you who have already copied an image from your desktop, you can paste it on a slide and get going.
How to Make a Whole Picture Transparent in PowerPoint?
Now that you have inserted a picture let us see how you can make it transparent to give you the desired impact.
Step 1: Selecting The Picture on a PowerPoint Slide
Select the picture that you’d like to make transparent. Notice an extra menu option called ‘Picture Format’ gets activated when you select the picture.

Step 2: Using the 'Picture Format' in PowerPoint
Click on the ‘Picture Format’ option to see an array of settings that let you edit a picture. Notice the ‘Transparency’ option in the picture format settings.

Step 3: Selecting the Transparency Option
Click on it to see seven immediate preset options to make a picture transparent starting from the least transparent (or opaque) to the maximum transparency. These are quite handy for those of you whipping up a quick slide deck.

Step 4: Customizing the Transparency Settings
Now, for those of you who need more options, there is one more thing that you can do.
Similar to what you did in Step 3, click on ‘Picture Format,’ and notice the paint bucket and brush icon named as ‘Picture Transparency Options.’

It opens a new pane on the right side of your screen. Notice the ‘Transparency’ option near the bottom right corner of the pane. By default, it is set at 0%.
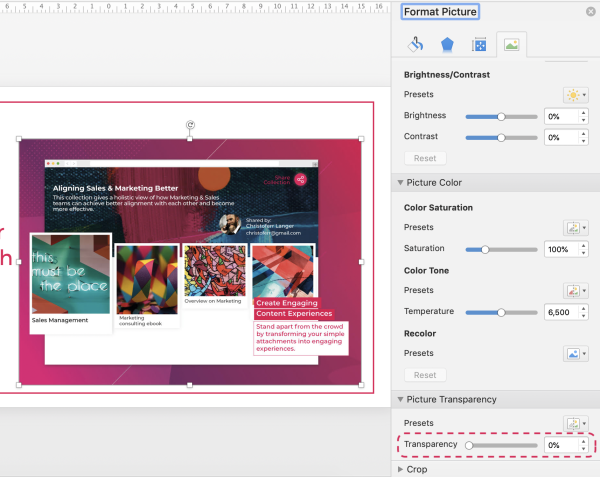
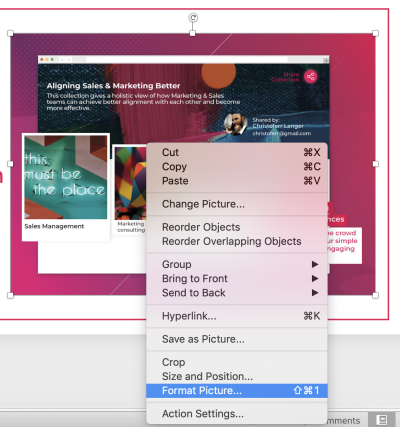
There is yet another way to open this option. Select the image that you’d like to make transparent, right-click on it, and select ‘Format Picture’ (as shown in the image below). You will see the formatting pane opening up on the right.
Step 5: Choosing the Transparency Settings
You can either input a numeric percentage number or use the scroll bar to make a picture transparent.

Note that you can input numbers only from 1 to 100. Notice that as you proceed from 1% to 100%, the image gets progressively transparent.
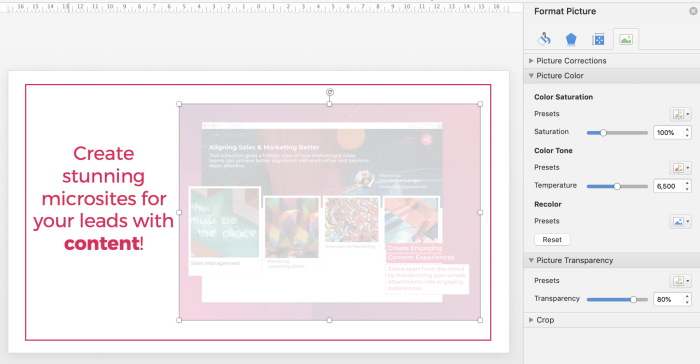
There you go, observe how the above image is now transparent.
How to Make a Picture Background Transparent in PowerPoint?
Now, we’ll teach you two quick tricks to make a picture background transparent (similar to what you see above).
If you are looking for answers on how to overlay pictures in PowerPoint using a transparent background, then we recommend these simple steps.
Trick #1 - Step 1: Selecting the Picture
Select the picture that you’d like to make transparent. Copy and paste it on top of the same picture.
Notice in the image below how we have copy-pasted and laid a picture on top of its original.

Trick #1 - Step 2: Using The 'Format Picture' Option in PowerPoint
Now, select the image in the background, and right-click it to open the ‘Format Picture’ option. Make the picture transparent (refer Step 6 above) to your liking, and then, this is what you do.
Select the picture on the foreground, and click ‘Picture Format’ at the top on the menu-bar. Observe the option to ‘Crop’ an image.

Use the ‘Crop’ option to cut off portions of the picture that you do not want so that only a part of the picture stays.
Lo and behold! This way, you will be able to bring forth a portion of the image that you want your viewers to focus on.

Trick #2 - Step 1
Repeat Step 1 that we explained in Trick #1 above.
Trick #2 - Step 2
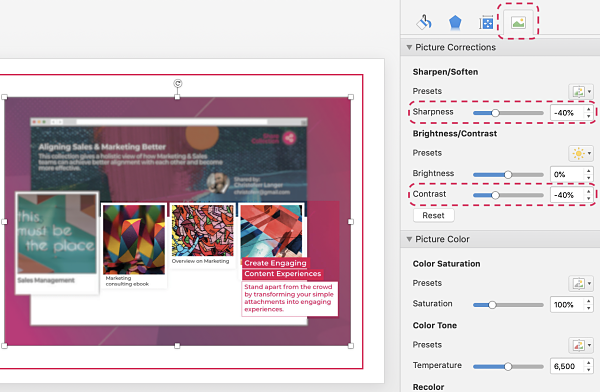
Then, right-click on the image, and select Format Picture -> choose picture corrections in the right-hand pane. You can reduce the Sharpness and Contrast of the image. In the picture below, we have reduced both these metrics to -40%. You could even reduce the Brightness a little to amplify the image.
How to Fade a Picture in PowerPoint?
Now, there is yet another way to make a picture in PowerPoint transparent - by using colors and color tones. This step will fade the image so that it lets other elements of the slide take center stage.
Here is how you do it.
Step 1: Selecting a Picture
Select the picture you’d like to make transparent and on the ‘Picture Format’ option, click on ‘color’ to select the color.
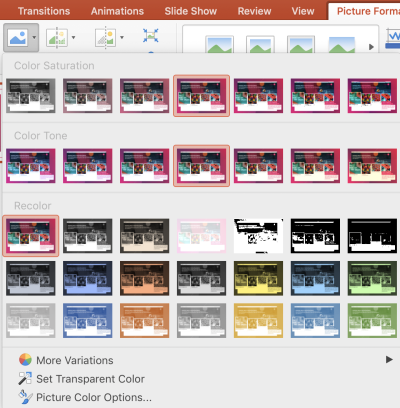
It will color the entire picture in a faded or tinted manner. You could even use the preset color options or pick a color of your choice to fade your picture.
How to Make a Picture Transparent in PowerPoint 2010?
In this section, we will learn how to make a picture transparent in PowerPoint 2010 and PowerPoint 2013. Some of you might still be using these older versions of PowerPoint (with old menu structures), so here is your guide to it.
Step 1: Selecting a Shape
On your PowerPoint 2010/2013, open a new slide and go to Shapes on the top menubar, and click on the ‘rectangle’ icon to draw a rectangular shape over your existing picture.

Step 2: Making the Shape Transparent
Make sure you lock the aspect ratio of the shape so that the image in the background does not get distorted.
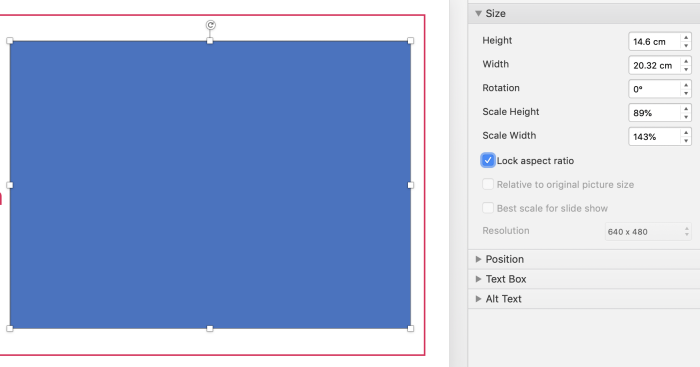
In the above image, the rectangle that we created lies perfectly on top of the image.
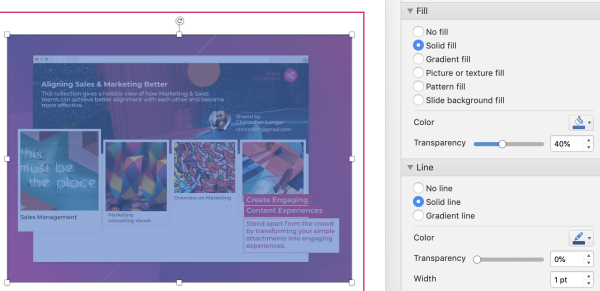
Now, on the ‘Fill & Line’ option on the right side pane of your slide, choose the transparency percentage. You can choose a number from 0% to 100% - 0% is completely opaque, while 100% is completely transparent.
Here is how your image will look with a 40% transparency applied to the shape overlaying it.
Making a Picture Transparent in PowerPoint - A Few Things To Remember
Here are a few things that you’d need to keep in mind as you make your picture transparent:
- Making a picture transparent gives it a soft look, but you don’t want to do it in every image. So, use this option judiciously.
- If you are creating a deck that is likely to be printed, then we suggest not to use a transparent picture as it can distort images. It is because most printers do not support color formats that allow transparency.
- While PowerPoint gives you several options to edit an image, don’t hesitate to use more advanced software such as Adobe Photoshop. It is advanced software that gives you incredible options to make your pictures look great.
Making a picture transparent makes your presentations look professional and stand out from others. No matter whether you are a sales rep, a marketer, a designer, or a photographer, learn these simple techniques to deliver on every project.
Additional Reading
Learn how to add a signature in Gmail with these simple steps.
